Hosting a WordPress Blog with Amazon Linux
Hosting a WordPress Blog with Amazon Linux
Written By: Nagaraj Gurusamy, Technical Manager, Powerupcloud | Contributors: Suganya G, Cloud Support Engineer, Powerupcloud
Creating a website from scratch is difficult or requires a lot of coding and design skills — but that’s no longer true!.
In 2016, content management systems (CMS) like WordPress have made creating a website accessible to everyone.To put simply, a content management system (or website building platform) is a user-friendly platform for building websites and managing your own online content, instead of using a bunch of loose HTML pages. Here is a detailed instruction on how to setup a Wordpress blog website on an Amazon EC2.
Prerequisites
Install a LAMP Web Server on Amazon Linux to meet these prerequisites and then return to install WordPress.
We strongly recommend that you associate an Elastic IP address (EIP) to the instance you are using to host a WordPress blog. This prevents the public DNS address for your instance from changing and breaking your installation. If you own a domain name and you want to use it for your blog, you can update the DNS record for the domain name to point to your EIP address (for help with this, contact your domain name registrar). You can have one EIP address associated with a running instance at no charge. If you don’t already have a domain name for your blog, you can register a domain name with Amazon Route 53 and associate your instance’s EIP address with your domain name. For more information.
LAMP Installation:
- Connect to your instance using Putty.
- Install required packages
Use the
yum install command to install multiple software packages with all dependency packages.[ec2-user ~]$ sudo yum install -y httpd24 php56 mysql55-server php56-mysqlnd
Above command will install Apache web server ( httpd ), MySQL 5.5 and php5.6 including all dependencies.
3.Start the Apache web server using below command
[ec2-user ~]$ sudo service httpd start
Use the chkconfig command to configure the Apache web server to start at each system boot.
[ec2-user ~]$ sudo chkconfig httpd on
Tip: The chkconfig command does not provide any confirmation message when you successfully enable a service. You can verify that httpd is on by running the following command.
[ec2-user ~]$ chkconfig --list httpd
Here, httpd is configured to run on 2, 3, 4, and 5 on boot
Test your web server in a web browser by entering your public DNS address (or the public IP address) of your instance; you should see the Apache test page.If you are unable to see the Apache test page, check that the security group you are using contains a rule to allow HTTP (port 80) traffic.
4.Change the permission of the folder
/var/www
Note — This test page appears only when there is no content in /var/www/html. When you add content to the document root, your content appears at the public DNS address of your instance instead of this test page.Apache httpd serves files that are kept in a directory called the Apache document root. The Amazon Linux Apache document root is /var/www/html, which is owned by root by default.
[ec2-user ~]$ ls -l /var/www
total 16
drwxr-xr-x 2 root root 4096 Jul 12 01:00 cgi-bin
drwxr-xr-x 3 root root 4096 Aug  7 00:02 error
drwxr-xr-x 2 root root 4096 Jan  6  2012 html
drwxr-xr-x 3 root root 4096 Aug  7 00:02 icons
To allow ec2-user to manipulate files in this directory, you need to modify the ownership and permissions of the directory. You can change the group and owner of /var/www directory as
www and give write permissions for that group. Any members of that group will then be able to add, delete, and modify files for the web server.
To set file permissions
Add your user (in this case, ec2-user) to the www group.
[ec2-user ~]$ sudo usermod -a -G www ec2-user
Important: You need to logout and log in back to pick up the new group permission to take effect. You can use the exit command or close the terminal window.
Log out and then log back in again, and verify your membership in the www group.
To log out enter the command exit.
[ec2-user ~]$ exit
Reconnect to your instance, and then run the following command to verify your membership in the www group.
[ec2-user ~]$ groups ec2-user wheel www
Change the group ownership of /var/www and its contents to the www group.
[ec2-user ~]$ sudo chown -R root:www /var/www
Change the directory permissions of /var/www and its subdirectories to add group write permissions and to set the group ID on future subdirectories.
[ec2-user ~]$ sudo chmod 2775 /var/www
[ec2-user ~]$ find /var/www -type d -exec sudo chmod 2775 {} \;
Recursively change the file permissions of /var/www and its subdirectories to add group write permissions.
[ec2-user ~]$ find /var/www -type f -exec sudo chmod 0664 {} \;
Now ec2-user (and any future members of the www group) can add, delete, and edit files in the Apache document root.
Test your LAMP web server
If your server is installed and running, and your file permissions are set correctly, your ec2-user account should be able to create a simple PHP file in the /var/www/html directory that will be available from the Internet.
Create a simple PHP file in the Apache document root.
[ec2-user ~]$ echo "<?php phpinfo(); ?>" > /var/www/html/phpinfo.phpTip: If you get a "Permission denied" error when trying to run this command, try logging out and logging back again to pick up the proper group permissions that you configured.
In a web browser, enter the URL of the file you just created. This URL is the public DNS address of your instance followed by a forward slash and the file name.
For example:
http://my.public.dns.amazonaws.com/phpinfo.php
http://my.public.dns.amazonaws.com/phpinfo.php
You should see the PHP information page.
Secure the MySQL server
The default installation of the MySQL server has several features that are great for testing and development, but they should be disabled or removed for production servers. The
mysql_secure_installation command walks you through the process of setting a root password and removing the insecure features from your installation. Even if you are not planning on using the MySQL server, performing this procedure is a good idea.
1. Start the MySQL server.
[ec2-user ~]$ sudo service mysqld start
2. Run mysql_ secure_ installation
[ec2-user ~]$ sudo mysql_secure_installation
3. Stop MySQL service ( Optional )
Stop the MySQL server if you do not plan to use it right away. You can restart the server when you need it again.
[ec2-user ~]$ sudo service mysqld stop
Stopping mysqld: [ OK ]
4. Start the MySQL at every boot, enter below command.
[ec2-user ~]$ sudo chkconfig mysqld on
You should now have a fully functional LAMP web server. If you add content to the Apache document root at /var/www/html, you should be able to view that content at the public DNS address for your instance.
WordPress Installation
To download and unzip the WordPress installation package
Download the latest WordPress installation package with the
wgetcommand. The following command should always download the latest release.[ec2-user ~]$wget https://wordpress.org/latest.tar.gz
Unzip and unarchive the installation package. The installation folder is unzipped to a folder called wordpress.
[ec2-user ~]$ tar -xzf latest.tar.gz
[ec2-user ~]$ ls latest.tar.gz wordpress
To create a MySQL user and database for your WordPress installation
Your WordPress installation needs to store information, such as blog post entries and user comments, in a database. This procedure helps you create a database for your blog and a user that is authorized to read and save information to that database.
1. Start the MySQL server if it stoped.
[ec2-user ~]$ sudo service mysqld start
Log in to the MySQL server as the root user. Enter your MySQL root password when prompted; this may be different than your root system password, or it may even be empty if you have not secured your MySQL server.
2. Login to the MySQL
[ec2-user ~]$ mysql -u root -p Enter password:
3. Create a user and password for your MySQL database.
Your WordPress installation uses these values to communicate with your MySQL database. Enter the following command, substituting a unique user name and password.
mysql> CREATE USER 'wordpress-user'@'localhost' IDENTIFIED BY 'your_strong_password'; Query OK, 0 rows affected (0.00 sec)
Make sure that you create a strong password for your user. Do not use the single quote character ( ‘ ) in your password, because this will break the preceding command. For more information about creating a secure password, go to http://www.pctools.com/guides/password/. Do not reuse an existing password, and make sure to store this password in a safe place.
4. Create your database.
Give your database a descriptive, meaningful name, such as wordpress-db.
Note: The punctuation marks surrounding the database name in the command below are called backticks. The backtick (`) key is usually located above the Tab key on a standard keyboard. Backticks are not always required, but they allow you to use otherwise illegal characters, such as hyphens, in database names.
5. Grant permission
Grant full privileges for your database to the WordPress user that you created earlier.
[ec2-user ~]$wget https://wordpress.org/latest.tar.gz
6. Flush the MySQL privileges
Flush the MySQL privileges to pick up all of your changes.
[ec2-user ~]$ tar -xzf latest.tar.gz
[ec2-user ~]$ ls
latest.tar.gz wordpress
Exit the mysql client. Enter
quitCreate and edit the wp-config.php file
The WordPress installation folder contains a sample configuration file called wp-config-sample.php. In this procedure, you copy this file and edit it to fit your specific configuration.
Copy the wp-config-sample.php file to a file called wp-config.php. This creates a new configuration file and keeps the original sample file intact as a backup.
[ec2-user ~]$ sudo service mysqld start
Edit the wp-config.php file with your favorite text editor (such as nano or vim) and enter values for your installation.
Find the line that defines DBNAME and change databasename_here to the database name that you created in Step 4 of To create a MySQL user and database for your WordPress installation.
[ec2-user ~]$ mysql -u root -p Enter password:
Find the line that defines
DB_USER and change username_here to the database user that you created in Step 3 of To create a MySQL user and database for your WordPress installation.mysql> CREATE USER 'wordpress-user'@'localhost' IDENTIFIED BY 'your_strong_password';
Query OK, 0 rows affected (0.00 sec)
Find the line that defines
DB_PASSWORD and enter the strong password that you have created in Step 3 of To create a MySQL user and database for your WordPress installation.Note:
Find the section called Authentication Unique Keys and Salts. These
KEY and SALT values provide a layer of encryption to the browser cookies that WordPress users store on their local machines. Basically, adding long, random values here makes your site more secure.
After adding keys Save the file and exit your text editor.
To move your WordPress installation to the Apache document root
The location of files depends on whether you want your WordPress blog to be available at the root of your web server (for example: my.public.dns.amazonaws.com) or in a subdirectory or folder (for example: my.public.dns.amazonaws.com/blog).
Choose the location where you want your blog to be available and only run the mv associated with that location.
To make your blog available at my.public.dns.amazonaws.com/bloginstead, create a new folder called blog inside the Apache document root and move the files in the wordpressfolder (but not the folder itself) to the new blog folder.
quitImportant
For security purposes, if you are not moving on to the next procedure immediately, stop the Apache web server (httpd) now. After you move your installation to the Apache document root, the WordPress installation script is unprotected and an attacker could gain access to your blog if the Apache web server were running. To stop the Apache web server, enter the command
DB_USERTo allow WordPress to use permalinks
WordPress permalinks need to use Apache .htaccess files to work properly, but this is not enabled by default on Amazon Linux. Use this procedure to allow all overrides in the Apache document root. Open the httpd.conf file with your favorite text editor (such as nano or vim). If you do not have a favorite text editor, nano is much easier for beginners to use.
DB_PASSWORD
Find the section that starts with .
KEY
Save the file and exit your text editor.
To run the WordPress installation script
Use the chkconfig command to ensure that the httpd and mysqld services start at every system boot.
SALT
Verify that the MySQL server (mysqld) is running.
Important
If the mysqld service is not running, start it.
Verify that your Apache web server (httpd) is running.
undefined
If the httpd service is not running, start it.
undefined
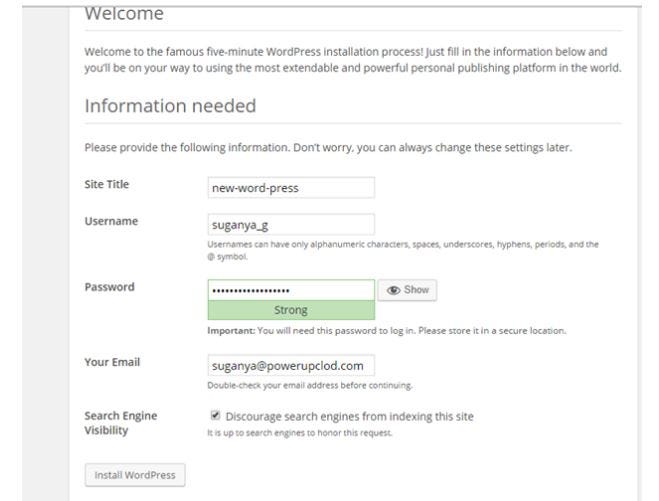
In a web browser, enter the URL of your WordPress blog (either the public DNS address for your instance or that address followed by the blog folder). You should see the WordPress installation screen.
http://my.public.dns.amazonaws.com
Enter the remaining installation information into the WordPress installation wizard.
After installing it shows success

Login to the portal using the username password that you have created while installation

After Login you can view the Dashboard

That’s it. A brand new WordPress blog site is now ready for you.

Comments
Post a Comment